Quick Answer: How Do You Edit a Photo With AI?
Upload the photo to an AI image editor, describe the change in one sentence — what should change and what must stay identical — and pick a model suited to the edit. Background swaps, object removal, relighting, product-in-scene shots and added text all work from a prompt, with no masks or layers. For product photos, use a photo-editing model that preserves the source, then check labels and small text before you post.
AI photo editing used to mean a brush tool and a lot of patience. In 2026 it means writing a sentence. Image-to-image models such as Nano Banana Pro Edit, GPT Image 2 Edit and Seedream take your photo plus an instruction and return the edited picture, usually in under a minute.
That is the part everyone has figured out. What still trips people up is choosing the wrong editor for the edit, writing prompts that only say what to change, and posting a product shot whose label has quietly been redrawn. This guide covers all three.
What You Can Edit With AI (and the Prompt for Each)
These are the edits social posts need most often. Every prompt follows the same shape — change, then keep — because an editor that is only told what to change feels free to change everything else too.
| Edit | Prompt that works | Use it for |
|---|---|---|
| Change the background | “Replace the background with a sunlit marble kitchen counter. Keep the product, its label and its shadow identical.” | Product shots, portraits, listings |
| Remove the background | No prompt — run a background remover | Cut-outs, marketplace images, layered graphics |
| Product in a scene | “Place this bottle on a beach towel beside sunglasses, late-afternoon sun. The bottle stays exactly as shown.” | Lifestyle posts, ads |
| Remove an object | “Remove the price sticker and the cable on the left. Change nothing else.” | Cleaning up real photos |
| Relight or change the season | “Same scene at golden hour, warm low sun from the right. Same framing and objects.” | Seasonal campaigns, reusing one shoot |
| Restyle | “Same composition as a 1990s film photo: grain, soft contrast, slightly faded colour.” | Theme pages, mood posts |
| Add text | “Add a bold ‘30% OFF THIS WEEKEND’ badge in the top-right corner, white on red.” | Sale posts, stories, announcements |
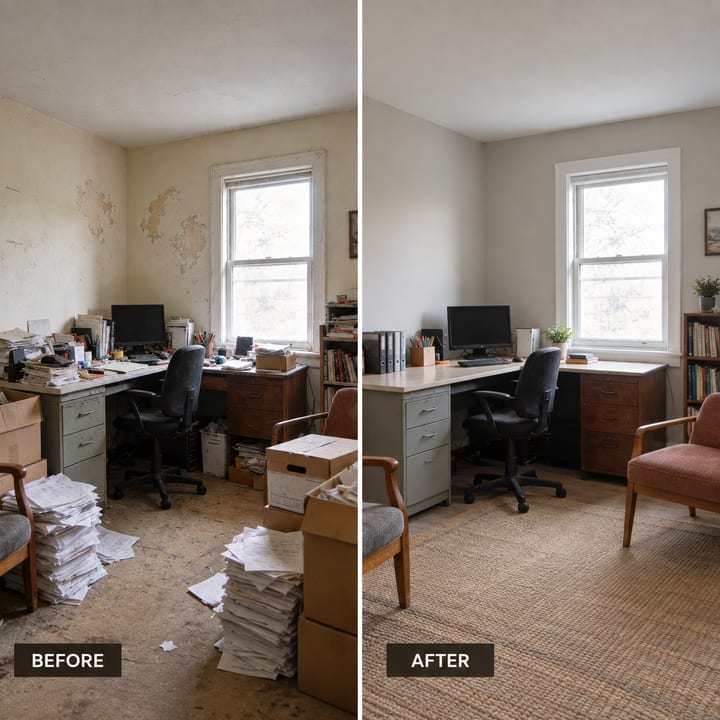
| Before & after | “Two equal panels: left is the original labelled BEFORE, right shows the room decluttered and painted sage green, labelled AFTER. Identical framing.” | Services, skincare, fitness, home |
Which AI Image Editor to Use for Each Edit
Image editors are not interchangeable. They fall into three groups, and picking from the wrong group is the most common reason an edit comes back wrong.
- Faithful editors — keep the subject, change the rest. Nano Banana Pro Edit (highest detail), Nano Banana 2 Edit (fast), Seedream 4.5 Edit, Seedream 5 Lite Edit (budget), Seedream 5 Pro Edit and Grok Imagine Edit. Use these for background swaps, cleanups, relighting and anything involving a real product.
- Text-in-image editors — when the result needs words. GPT Image 2 Edit, Nano Banana Pro Edit and Qwen Image 3 Edit render legible headlines and badges. Most other models turn added text into plausible-looking gibberish.
- Style-reference editors — a new image in the style of yours. Krea 2 Medium Edit and its Turbo version treat your photo as inspiration and redraw the subject. Great for a mood or a look; wrong for a product, because the product that comes back is not yours.
Plus one utility: a background remover does exactly one job — a clean cut-out — with no prompt, and is cheaper than asking a full editor to do the same thing.
Several editors also take more than one input image: Qwen Image 3 Edit up to four, Seedream 5 Pro Edit up to fourteen. That is how you put the jacket from one photo on the model in another, or keep a set of images visually consistent. The full list, with what each is best at, is on the AI photo editor page.
How to Edit a Photo With AI, Step by Step
- Start from the best photo you have. The editor keeps what it is given. A blurry or badly lit subject stays blurry and badly lit on a beautiful new background — and now it looks pasted in.
- Pick the editor for the job. Faithful editor for a product, text-in-image editor for a sale badge, the background remover for a plain cut-out.
- Write the edit as change plus keep. “Replace the background with a marble counter; keep the bottle, label and shadow identical.” Naming the shadow matters: without it the editor often removes it, and a product with no shadow floats.
- Check the small print. Zoom in on labels, logos, hands and any text before posting. If something drifted, re-run once, then switch editor rather than re-prompting the same one ten times.
- Add the logo and size it for the platform. Place your real logo file as an overlay rather than asking the model to draw it, and match the aspect ratio to the network — 4:5 for the Instagram feed, 9:16 for Stories, Reels and TikTok. The image size guide has every platform.
- Publish or schedule. Write a caption for each network and post the edit, or put it on the calendar.
Three Ways AI Photo Edits Go Wrong
1. The product gets quietly redrawn
The edit looks perfect at phone size. At full size the label reads “Organc Vitamn C”, or the cap is a slightly different shape. Faithful editors do this far less than style-reference ones, but fine print is the first thing to drift on any model. Two fixes: tell the editor explicitly to keep the label identical, and always zoom in before you post. For a logo that must be pixel-perfect, never generate it — overlay the real file.
2. The light doesn't match
A product lit from the left on a background lit from the right reads as fake instantly, even to people who cannot say why. Describe the light in the prompt (“warm low sun from the left, matching the product”) or choose a background that plausibly fits the light you already have.
3. The edit fixes the wrong problem
If the original is a dull photo of a dull angle, a new background gives you a dull photo of a dull angle somewhere nicer. When the composition is the problem, generating a new shot from scratch — or a product-in-scene edit that re-stages the product — beats patching the original.
Do You Have to Label AI-Edited Photos?
Meta, TikTok and YouTube ask creators to disclose realistic content that was AI-generated or significantly altered, with the strictest rules around real people and real events. A background swap on a product shot is a routine edit, on par with what retouching has always done. A realistic fake of a person saying or doing something is not. When in doubt, use the platform's AI label — it carries no reach penalty, and an undisclosed realistic fake can get a post removed.
Editing Inside Your Social Media Tool vs a Standalone Photo Editor
A standalone AI photo editor ends at the download button. Then the image goes to your camera roll, back up to each network, gets cropped by hand and captioned in six different apps.
In Autoadify's AI photo editor the edit is the first step of the post rather than the last step of a separate job: the edited image lands in your media library, captions are written for each network, and the post is published or scheduled to Instagram, Facebook, TikTok, LinkedIn, X, Threads, YouTube, Bluesky and Reddit from the same screen. You can also ask the AI Manager in chat — “make the background of yesterday's product shot a sunset and schedule it for Friday” — and it edits, drafts the caption and waits for your approval before posting. Store product photos synced from Shopify or WooCommerce are available to edit directly.
Frequently Asked Questions
Can AI edit an existing photo, or only generate new ones?
Both. Image-to-image editors take your photo plus an instruction and change only what you describe. Text-to-image models create a new picture from nothing. For anything involving a real product or person, editing your real photo is the safer choice.
What is the best free AI photo editor for social media?
For quick edits a budget faithful editor is enough, and for a clean cut-out a background remover. Autoadify's Free plan needs no card and includes Grok Imagine Edit and the Background Remover, plus scheduling to your social accounts; Seedream, GPT Image 2 and Nano Banana editors open up on paid plans.
How do I change the background of a photo with AI?
Upload the photo to a faithful editor and write: “Replace the background with [new setting]. Keep [the subject], its edges and its shadow identical.” Describe the light of the new background so it matches the subject.
Which AI is best for editing product photos?
Nano Banana Pro Edit for the highest detail, Seedream for fast and low-cost edits, and GPT Image 2 Edit or Qwen Image 3 Edit when the image also needs text. Avoid style-reference editors for products — they redraw the item instead of keeping it.
Can AI add text to an image?
Yes, with a text-in-image editor such as GPT Image 2 Edit, Nano Banana Pro Edit or Qwen Image 3 Edit. Keep it short — a headline or a badge — and put the exact words in quotation marks in your prompt.
Will AI photo editing lower my reach on Instagram or TikTok?
No platform penalises an image for being edited with AI. Reach follows how people respond to the post. What does get posts removed is undisclosed realistic AI content of real people or events, so label those.
The Bottom Line
Pick the editor by the job, write every prompt as change plus keep, and zoom in before you post. Do those three things and AI photo editing turns one decent product photo into a month of posts — backgrounds, seasons, sale badges and all.
Ready to automate your social media?
Autoadify gives you access to 80+ AI models, auto-scheduling across 10+ platforms, Shopify sync, and AI agents — all in one platform.
Start free